Breath of the wild is the first voice-acted Zelda game, but its story is delivered almost entirely through flashback - and you need to unlock each memory. Here's where to find all of the Recovered memories to learn the truth of 100 years ago.
Once you visit Impa in Kakariko Village and have all of the basic runes of your Sheikah Slate restored, she offers you a task and triggers a new main quest: you'll need to locate places you visited in the past in order to reawaken memories of 100 years ago. This is how much of Breath of the Wild’s story is delivered, through lovely context-filled flashbacks. They’re well worth viewing, though getting access to them can be a little bit frustrating depending on how much you like easter egg hunts.
The Legend of Zelda: Breath of the Wild: Locked Memories Quest - where to find all the recovered memories
Impa will unlock 12 photos in your Sheikah Slate, and each points to a different part of the world. When visited each will trigger the awakening of a major event from 100 years prior for Link, offering important information.
There are 18 recovered memories total. Twelve are found through the Sheikah Slate, one is revealed to you when the other 12 have been found, and the others are given via story events. Here's how to get them all.
Recovered Memories # 2, # 4, # 6, # 10 and # 18
As an important note, the second, fourth, sixth, tenth and eighteenth recovered memories will be awarded to you over the course of the game’s main story - so don’t worry about these. The eighteenth and last in particular is optional and will be revealed generally very late on (though as always with Breath of the Wild, it depends how you play) - it triggers if and when you pick up. They’re not part of this main quest.
Subdued Ceremony / Photo 1 - Recovered Memory # 1


This memory is the first photo on your Sheikah Slate and is pretty easy to find - if you look on the map, there’s a circular sort of place right in front of Hyrule Castle. This is the Sacred Ground Ruins. Head there and you’ll find this memory - it’s an interesting one, since it introduces you to some very key characters. There are a number of guardians around this area, so be careful when you go to grab this one, especially if you do it early on.
Recovered Memory # 3 / Photo 2 - Resolve and Grief


This memory is the second photo on the Sheikah Slate. It’s found just north of the plateau where you started the game. Look on the map for the area in Central Hyrule marked Hyrule Field. Zoom in - you’ll find the Exchange Ruins, Aquame Lake, the Forest of Time and the Gatepost Town Ruins. The nearest landmarks are the Oman Au Shrine and the Great Plateau Tower - Lake Kolomo is slightly north from both of these. The memory overlooks Lake Kolomo, looking towards the Dueling Peaks - the route to Karariko.
Subscribe to the VG247 newsletter Get all the best bits of VG247 delivered to your inbox every Friday!
Enable JavaScript to sign up to our newsletter
Recovered Memory # 5 / Photo 3 - Zelda's Resentment
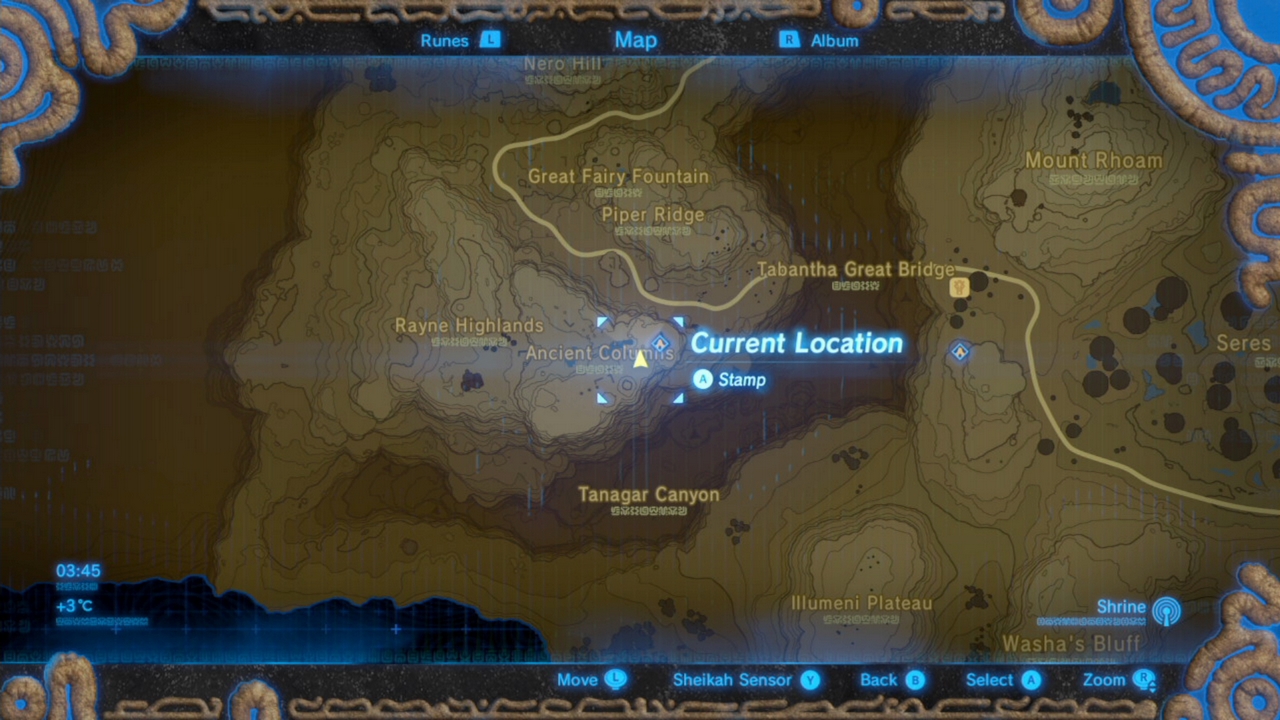

This is the 3rd photo in the Sheikah Slate. You’ll find this memory in the Tabantha area of the map. Just to the south of Piper Ridge (which is to the West of Tabantha Great Bridge), you’ll find an area called Ancient Columns. There’s a Shrine here - the challenging Tena Ko’sah Shrine. The memory spot is right in front of said shrine.
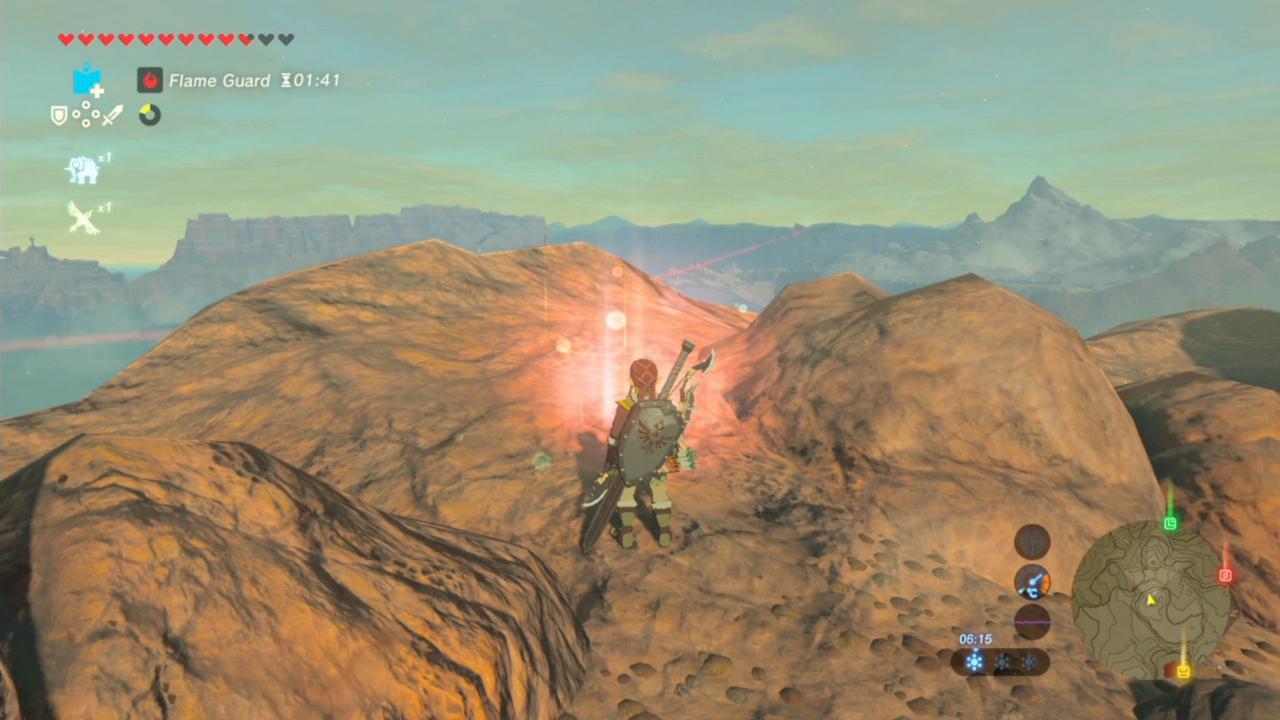
Recovered Memory # 7 / Photo 4 - Blades of the Yiga
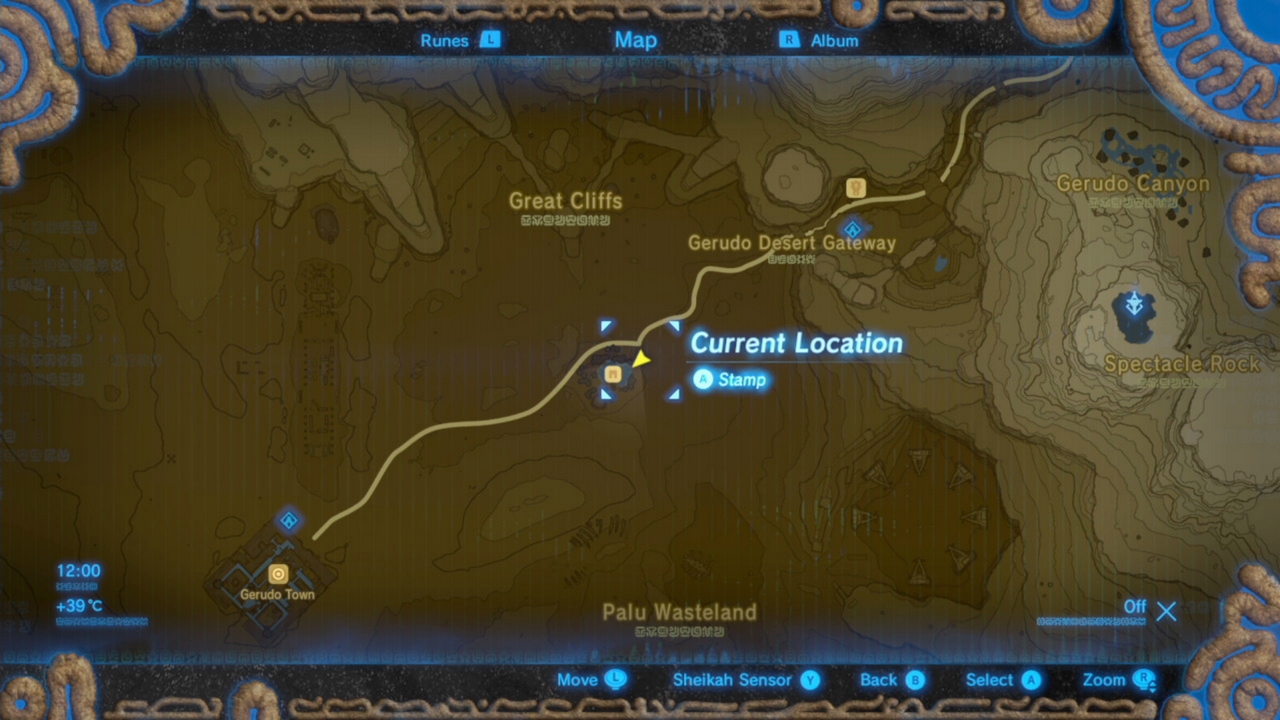

This memory is associated with the 4th photo in the Sheikah Slate. It's found at the Kara Kara Bazaar. Look at the Gerudo Desert on the map and then find Gerudo Town and Gerudo Desert Gateway. The Bazaar is at the halfway point between the two, and is difficult to miss. The memory trigger can sometimes be hard to see in the bright desert heat, but it's on the right side of the Bazaar when you look from the main shop.
Recovered Memory # 8 / Photo 5 - A Premonition

This memory is the 5th on the Sheikah Slate and is found in the Eldin Canyon area, the area on the outskirts of Death Mountain. The closest recognizable landmarks are the Woodland Tower and Minshi Woods - this is to the east of those. It's also to the north and slightly to the east of Pico Pond and the Mirro Shaz Shrine. It's up on the hills overlooking Hyrule Castle.
Recovered Memory # 9 / Photo 6 - Silent Princess
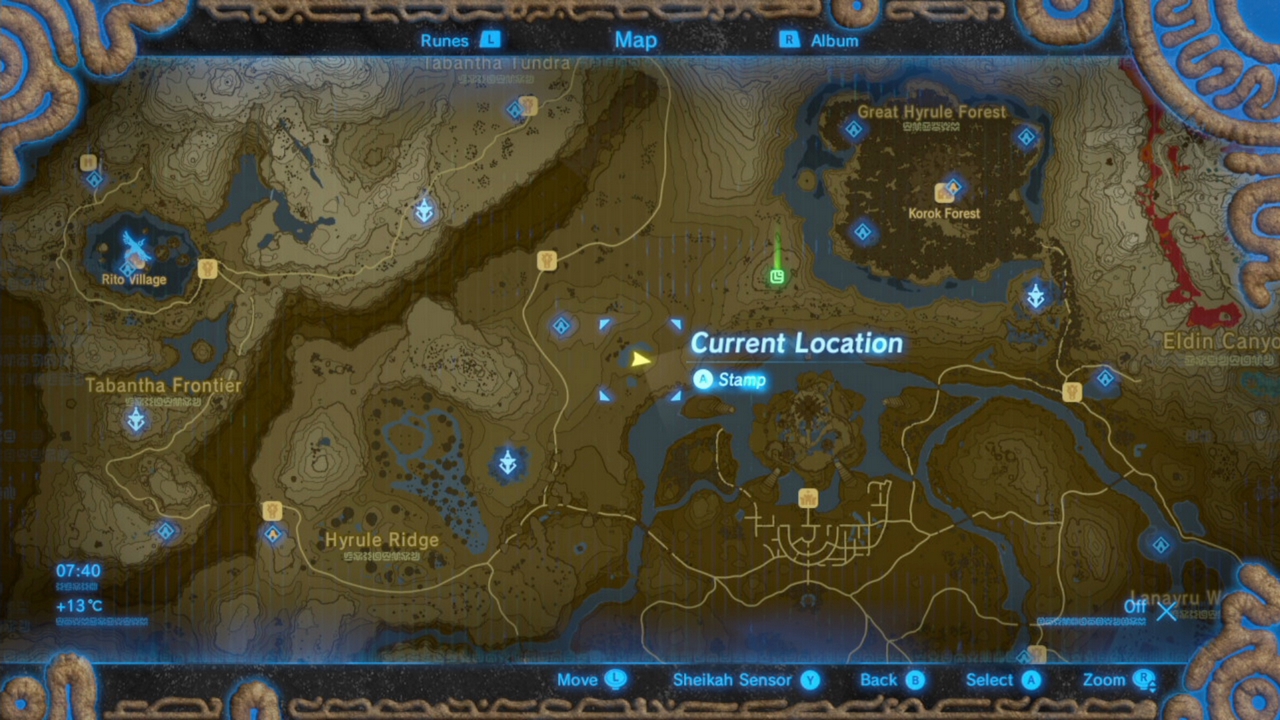

This memory is the 6th image on the Sheikah Slate and is found just north of Central Hyrule and Hyrule Castle, between Hyrule Ridge and the Great Hyrule Forest. The nearest landmarks are the Monya Toma Shrine and the Serenne Stable. Head a little south east from these; there are two small pools that are (if you zoom in) near Irch Plain.
Recovered Memory # 11 - Shelter from the Storm / Photo 7


This memory overlooks Lake Hylia's enormous bridge, but is a little distance away. It's the 7th memory on the Sheikah Slate. It's found on a hill that's sandwiched between Scout's Hill and Deya Lake. These hills are marked on the map as the Hills of Baumer. If you look for Scout’s Hill on the map, it’s just the other side of the Hylia river.
Recovered Memory # 12 / Photo 8 - Father and Daughter


This memory is a risky one to get - it's in Hyrule Castle, AKA the final dungeon of the game, of sorts. The thing is, you can explore Hyrule Castle any time without consequence so long as you don’t go to Ganon’s lair, though you do so at your own risk as deadly enemies are all over. There are multiple ways in, such as via swimming up waterfalls, going to the docks or gliding in from afar to avoid the attention of guardians or simply stocking up on health items and making a full-on assault. The castle itself is threatening and oppressive but also absolutely surviveable for a brief visit from early on.
Once inside, this memory is found on the Western side of the castle, high up. As far as I can tell you’ll need to head outside and do at least a bit of dodging guardians. In a Western Keep sort of area look for a room you’ll notice is Zelda’s quarters - there’s a diary written by her in here. Climb the wall to the second floor here and you’ll notice a small walkway - the memory takes place here. Consult our images, as finding the exact room can be a challenge.
Recovered Memory # 13 / Photo 9 - Slumbering Power


This memory is found in the Akkala Region. It's the 9th photo on the Sheikah Slate. Find the North Akkala Foothill - there you’ll be able to see the East Akkala Stable and Katosa Aug Shrine. Head directly West from there towards North Akkala Valley and Ordorac Quarry. Nestled between these two is the Spring of Power, and this is where the memory is recovered.
Recovered Memory 14 / Photo 10 - To Mount Lanaru


You’ll be able to find this memory, the 10th photo on the Sheikah Slate, up in the Safula Hill area to the west of Central Hyrule and east of Satori Mountain. Among this area is the Sanidin Park Ruins - once you get onto these high mountains look out for the ruins with a huge horse statue - this is where this memory is found.
Recovered Memory # 15 / Photo 11 - Return of Calamity Ganon


This memory is the 11th on the page of memory photos in your Sheikah Slate. It's found in the shadow of Lanayru. To the West of the mountain you’ll find Naydra Snowfield - this is actually really very useful, and the snowfield leads past Purifier Lake into Lanayru Promenade. It’s between these points at Lanayru Road - East Gate that you’ll find this memory to recover. Things got pretty bad, huh.
Recovered Memory # 16 / Photo 12 - Despair
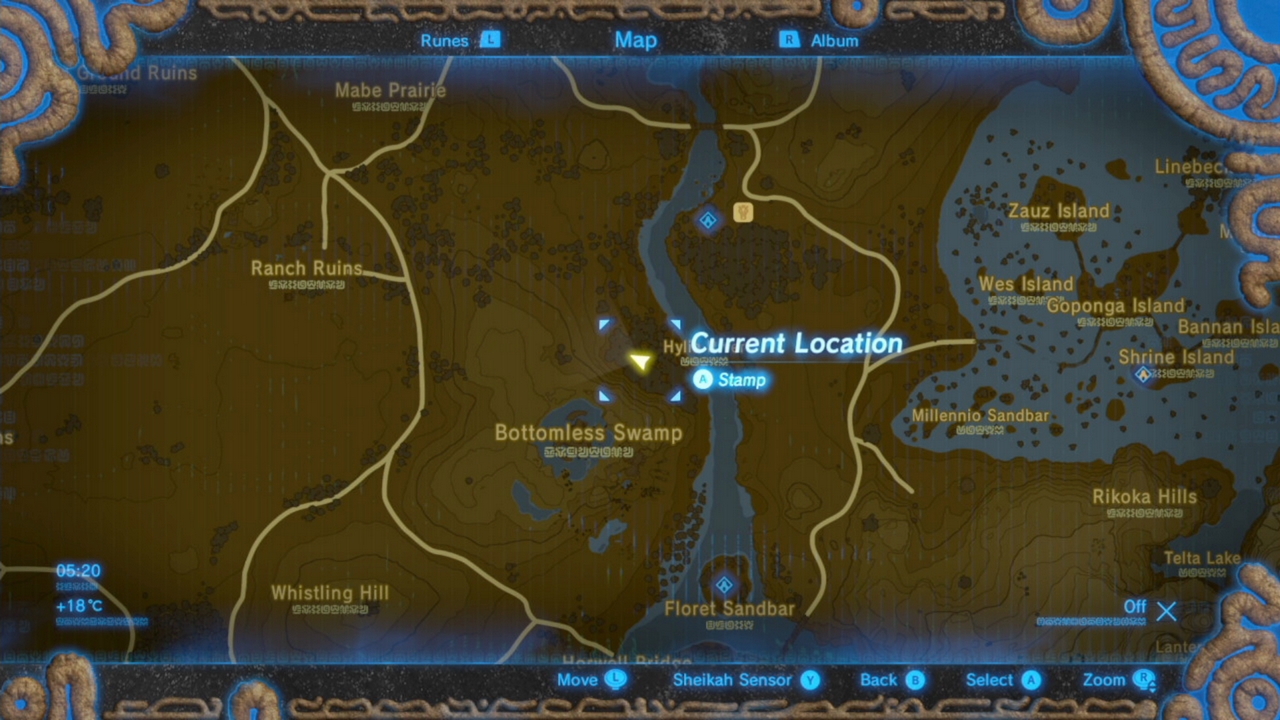

This memory is the final one, the 12th on the Sheikah Slate pictures. It's located just to the North-East of the Bottomless Swamp on the east side of Hyrule Field. If you look for some text on the map that says ‘Hylia River’ in between the Bottomless Swamp and the Kaya Wan Shrine and Wetland Stable, this memory is discovered right by this text in a small forested area.
Recovered Memory # 17 - Zelda's Awakening


The final memory that isn’t recovered naturally through story progression, this one isn’t backed up by a photo. After recovering all of the other 12 memories in the Sheikah Slate photos, return to Impa. She will reveal this final memory location to you ... and it’s been under your nose since she first gave you back these memories.
Once she’s shown you the image, head south from Kakariko, back over the bridge towards the Dueling Peaks Stable and Ha Dahamar Shrine. To the east of this is Fort Hateno, and between the two is the Ash Swamp area. The final memory is found in this location, the place where things came to a head 100 years ago.
If you are familiar with The Legend of Zelda series and have played at least some of the past parts, then you will surely see, when you spend a couple of hours in Breath of the Wild, that it is much larger than its predecessors. The game is now more like Skyrim, which is known to epitomize the sandbox RPG genre.
If you focus on the experience of past games, then you will miss the many fascinating stories and events that are scattered throughout the world of Breath of the Wild. That is why we put together this guide so that newbies can catch their breath and familiarize themselves with introductory content that is highly discouraged to skip.
does not limit you and does not force you to follow the main storyline. Did you see a mountain on the horizon? So go and visit her!
Warm clothing
On the territory of the Great Plateau, you may stumble upon an abnormally cold place where the temperature is incredibly cold. You can get around this obstacle course with hot food, as well as potions that increase resistance to cold. But if you wish, you can choose another option - a warm doublet, which will be no worse able to protect you from frost.

You can get this wardrobe item on the Great Plateau. You can find it in the southeast of the map, inside a shack owned by a peasant. In his diary, you can read about a certain recipe that can help warm up, but the old man forgot the ingredients. Help him by crafting Hot Pepper, Meat, and Perch food from Hyrule.
Tell the peasant about your achievement, and then he will give you a doublet. You can also find the same clothes on Mount Hailia, where the same old man will meet you again. Now he will reward you with a doublet for perseverance that you managed to climb to such a height without normal clothes.
In the event that you have passed the main line in this location, then the peasant's quests will disappear. However, a warm doublet will still be waiting for you in the peasant's hut - he will simply leave it for you.
Harvesting
Every blade of grass, food, or cloth that can be obtained in The Legend of Zelda: Breath of the Wild is used for some purpose.
If you notice a shine in a depression in a rock or in a tree crown, be sure to inspect this place, as any luminous thing may come in handy in the future. Not only that, the ingredients don't take up space in your luggage, so collect as many as you like.

Having procured meat, fruits, spices and other food, feel free to combine it at the barbecue to find out the recipe for the perfect dishes. The better and more expensive the recipe, the more boosts you get, so don't neglect this!
Arm yourself with the last word
On the territory of Great Plata there are many good weapons (although useless, too, in bulk). Often you will come across all sorts of sticks and clubs, which, although they do little damage, still cope well with local opponents - crowds of Bokoblins.
Absolutely any weapon, except, breaks, so on the way to this gun you will have to change many options. To always have a spare weapon, inspect the chests and do not be afraid to fight strong opponents.
By the way, in the peasant's shack you already know, you will find an ax, which is quite useful at the start of the game. And on the Plateau, you can quickly get a hammer, which is located in the Sanctuary on the mountain.

The most good weapon dropped from bosses and shrines. But this does not mean that you do not need to explore other places like villages or stables in search of guns.
In the latter, you can find weak options that are worth using against non-dangerous opponents. Spending powerful weapons on crowds of low-level enemies is bad manners.
Look for Korokov
In your travels around the world of The Legend of Zelda: Breath of the Wild, you will often stumble upon mysterious places. Such anomalies, represented by a lonely stone in an open field, a ring of lilies on a pond, and so on.

Once in such a place, be sure that Koroki is located somewhere nearby. If you find such a creature, you will receive from him a Korok seed - the most valuable currency that will be useful to you more than once during the passage.
Show help Estu
On the way to the village of Kakariko, you will stumble upon one of the Koroka tribe, whose name is Estu. It is he who will give you the first seed, but first you have to help him.

Complete his mission to be able to contact him in the future for improvements. Give Estu the Korok seeds to increase the number of inventory slots for any type of weapon.
Arcanize your horse
Hyrule is a giant country that is designed for dozens of hours of exploration. On your own two, you will naturally spend hours crossing huge wild spaces, which will eventually get boring. To prevent this, get yourself a horse.
In The Legend of Zelda: Breath of the Wild, you can find a wild mare and tame her. They usually live above and to the right of the Great Plateau, or in an open field near the Gemini.
To tame a horse, you need extraordinary dexterity. You must first sit down to make as few sounds as possible. Then sneak up to the mare until you are close to her. Then immediately jump on it and quickly press the "pacify" button. The steeper the horse has a temper, the harder you will have.

After that, you must give your "kidnapping" legal status. Go to the stable, where you can register your new vehicle and give it a nickname. It is done.
However, the mechanics of interaction with the horse does not end there. Please note that there is a trust scale between you, the growth of which will increase the horse's affection for you. To build up the scale, simply praise the filly at every opportunity.
And shield the towers and activate them
In your wanderings around Hyrule, you often have to stumble upon the Towers of Rebirth, which are located in absolutely every area in a single copy. Once you climb to the top of this structure, you can activate it to reveal a map of the area.

As a result, the location of the nearest stables, sanctuaries and other useful places will appear on your map. However, absolutely everything interesting points and the places of events will not open - here, in any case, you will have to act manually.
O watch the defeated guards
On the perimeter of the Great Plateau, there are occasional pieces of forgotten Guardians. Once majestic, they guarded these areas, but now they only remind of themselves with rusty debris.

By exploring these ruins, you will definitely find something useful. In any case, you will always come across ancient wreckage that can be sold for a good price. You may also need them at the end of the game for crafting or side quests.
And follow the Sanctuary
The Legend of Zelda: Breath of the Wild lacks HP-increasing hearts, as was the case in previous games in the series. From now on, you will have to increase health in a different way - by going through the Sanctuaries. In them you will find statues of the Goddess to whom you will need to pray.

For the successful passage of the holy place, you will receive four mental orbs, which can be exchanged for increased health or increased stamina.
Accordingly, to fight especially strong opponents, you should increase your HP. And if you find that you cannot climb a certain mountain, then it makes sense to go through the next Sanctuary, and then invest points in the stamina.
Rock Climber
Clothing gives not only frost resistance. To the right of the Great Plateau, after passing the "Gemini", you will find the holy place of Ri-Dahi. There is a box in which you will find the "Rock Climber's Handkerchief".

This item is incredibly useful in mountaineering - it will speed up your movements as you climb. Get this item as quickly as possible, as you will have to climb mountains very often.
Find the Big Fairy
While traveling, you will meet fairies big and small. The regular ones will give you small bonuses if you manage to fish them near the pond. Big fairies offer their help only for rupees.

You can get only one action from fat fairies - improving things. Each fairy can upgrade your outfit only once, but significantly.

This is why you should find them all. By the way, you will find the first spring with a fairy on a hill near the village of Kakariko.
Do not neglect treasures
The world of The Legend of Zelda: Breath of the Wild is bursting at the seams with a variety of treasures. You can find them almost everywhere, but they always lie in the same place - inside the chest.
During your adventure, look around and explore every corner, as valuable chests are most often hidden in such hidden and nondescript places. Blockages, the bottom of the river, the bowels of the ruins - treasures surround you, but only the most astute will open!

As you already understood, the world of The Legend of Zelda: Breath of the Wild is full of secrets and adventures. If you are curious, love to travel and explore, then this game is guaranteed to appeal to you.
Video: How to Run The Legend of Zelda Breath of the Wild on PC

Found a bug?
Let us know by highlighting the fragment with the mouse and pressing CTRL + ENTER. THANK YOU!
After a short intro, go to the control panel of blue color, which is located in the same room where Link woke up. A dialogue will begin near the panel, during which the young hero will receive the "Shiik Stone". After that, the door in front will open, so it's time to get out. There will be chests with the first equipment in the corridor, so look in them and get the following things: "Old Pants" and "Old Shirt". Get dressed, walk to the next panel a little further ahead, wait for the screen saver to end and go out into the fresh air.
: When you crouch down, you move more slowly, but it will be much more difficult to notice you that way.
Well now the main character ended up on the territory of the "Great Plateau". What to do? First of all, carefully look around, because there is a branch nearby that needs to be lifted so that there is at least something to defend against enemies. In any case, turn to the right side and go downstairs to the unknown character, who was presented in a small cutscene. You can also collect various items along the way.
: On the way down, Link will come across a red-orange mushroom called "Khayrulovik", so I recommend picking such mushrooms, as they are quite edible and will regenerate half a heart at a time. In addition, such mushrooms grow, as a rule, near trees.
When you come closer to the unknown old man, pick apples and talk to him. After the conversation, be sure to take the torch (you can light it from the fire, but if you put it in the bag, the fire will go out), which is located behind it.
Quest: "On the road with the Shyika Stone"
When you move a little forward from the old man, the voice of an unknown girl will again turn to Link, who will order you to go to the key point on the map. However, first of all, turn your attention to the stump - a lumberjack's ax will be stuck into it. Although the weapon will be slow and ineffective, it will still be much better than a wooden stick, so take it and go to the marked point on the map.
Along the way, Link will encounter the Bokoblin for the first time. The first fight will be easy, so after the kill, collect all the dropped items and move on. On the way, you can also see on the left side of the road two huge stones that can be pushed onto two bokoblin. After the murder, you can collect all sorts of ingredients and weapons called "Bokopalitsa", which may come in handy in further adventures.
: Keep an eye on the strength of the main character, because if he gets tired, he will not be able not only to run, but also to swim, climb and perform many other actions.
: There will be other bokoblin right next to the key point. However, now it will be possible to get "Bokoluk" from them, which at first will play the role of a bow, and from a lonely standing bokoblin it will be possible to take away "Camping sword" and "Bokoschit". Moreover, all this equipment will come in handy at the initial stages of the game.
In general, there will be many more bokoblins in the area, so when you get to the right place, go into a small gorge between the hills. So you will find the panel into which you will need to insert the Shyika Stone. After that the splash screen will start.
Quest: "Abandoned Plateau"
“As soon as I came down from the tower, an old man appeared. He revealed that Hyrule was destroyed by the Calamity Ganon a hundred years ago. To get to the castle, where the voice came from, I need to descend from the plateau, and for this I need a glider, like an old man's. He agrees to give it up in exchange for some kind of treasure ... "
So, at the request of the Old Man, you will have to go in search of the treasure. The desired place with the treasure is called the "Sanctuary of Oman-Au" and the white-bearded grandpa will show you where this place is, so go there. On arrival at the control panel, use the Shyik Stone. As a result, not only the doors will open, but also the first point of movement. In any case, go inside and go downstairs. The download will start.
: Not sure how to extinguish a burning shield? In fact, everything is quite simple, because if a shield or even a weapon caught fire, then it is enough to put the equipment in the bag and the fire will go out.
Sanctuary "Oman-Au"- Test: "Magnetism"
Well, inside the sanctuary, first of all, as usual, go to the control panel (which will have orange ornaments) to get the unique abilities for the Shiik Link Stone. As a result, the main character will receive a skill / ability (as it is more convenient) called "Magnesis", which will allow moving metal objects: having caught a metal object in a magnetic field, you can pick it up and move it freely.
Now it's time to use Magnesis, but first of all, pay attention to the large two plates that lie on the floor in the center of the hall - they are metal, so they can be lifted and removed to the side, thereby opening your way further. After that, jump down and go along the linear corridor, where at the end go up the stairs up. Now Link is blocked by a wall of metal cubes, so remove one of them, then use it to move the rest of the cubes, or build a kind of staircase or even disassemble the passage completely - it's up to you to decide what to do.
In any case, a battle with an ancient mechanism awaits on the other side of the hero, but nothing complicated: a couple of accurate blows with a sword or ax will quickly disable him. By the way, the robot can even be killed with a metal cube. Pick up the dropped items and move on. When you find yourself near a small abyss, then take a huge iron plate from behind and move it to another place forward. As a result, a kind of bridge will turn out. Now open the metal gate and go to the pedestal with the statue. After a short final speech, Link will receive a unique award called Spirit Orb. After receiving the reward, a cutscene will begin, during which the hero will be outside. A dialogue with the Old Man will begin.
: Before you go to the statue and get the "Orb of the Spirit", you can also get a chest, inside of which there will be a "Camping Bow". This chest is located on the left side in front of the gate that leads to the talking statue. To get this chest, you need to get as close to the edge of the road as possible and use a magnet, with which you can pull the chest to you and open it.
“When I left the sanctuary, the old man appeared again. He said that there are three more shrines on the plateau and he will give a glider only if I get a Spirit Orb in each of them. He also advised to move to the tower with the help of the Shyik Stone and look for the sanctuaries from there. "
The quest continues and now you have to get three more orbs, so move to the tower using fast travel (teleportation). At the top, use the visor to mark the next three temples. One temple will be located in the southern part of the map with mountains in the background. The second is located on the left side of the cathedral. And the last sanctuary will be located on the left side of the tower in ruins.
: Remember that each weapon has its own safety margin. Therefore, in order not to lose an important weapon, always try to monitor its condition.
First of all, I propose to go to the Sanctuary called "Ja-Baizh", which is located on the left side of the tower in ruins. However, be aware that there are dangerous machines in the ruins that can quickly deal with the young hero without any problems, so to get to the sanctuary, you should bypass them.
Sanctuary "Jah-Baizh"- Test: "Explosive Power"
As usual, approach the control panel with an orange ornament, after which the splash screen will begin. So now Link has got the Telebomb. With this skill, you can create an explosion at a distance. The explosion will destroy objects and deal a lot of damage to monsters. In addition, bombs can be either cubic or round - the choice should be based on the situation.